In the last years, I’ve been using Packer to build End-User-Computing Golden Images for Citrix, VMware, and Microsoft on multi-platforms like vSphere, Azure, GCP, etc. Recently I discovered the null builder, which extended my Packer experience. This experience I want to share with you in this blog post.
Scenario’s for the null builder
I now use the null builder in scenarios where no default Packer Builder is available (Nutanix AHV) or when there is a non-maintained community builder (Citrix XenServer/Hypervisor). More on Citrix Hypervisor later in this blog post.
I also use the null builder to test the provisioners in Windows Sandbox on my laptop. So I can retry the provisioners over and over again by simply restarting Windows Sandbox.
What is the null builder?
According to the documentation (https://www.packer.io/docs/builders/null): “The null Packer builder is not really a builder, it just sets up an SSH connection and runs the provisioners. It can be used to debug provisioners without incurring high wait times. It does not create any kind of image or artifact.”
The documentation stated that it creates an SSH connection but also works with a WinRM connection in Windows Image scenarios. You can use the null builder with WinRM as follows.
source "null" "PatrickvandenBorn-Blog" {
    communicator                           = "winrm"
    winrm_host                             = "10.0.0.204"
    winrm_insecure                         = "true"
    winrm_password                         = "SuperSecretPassword"
    winrm_timeout                          = "3m"
    winrm_use_ssl                          = "false"
    winrm_port                             = "5985"
    winrm_username                         = "UsernameWinRMConnect"
}
You can use secure WinRM by changing the parameters according to the WinRM Communicator documentation, which can be found here: https://www.packer.io/docs/communicators/winrm
Prepare vanilla Windows VM for Packer WinRM connection
To use the null builder, you can provision a vanilla Windows VM (Windows Server or Windows 10/11) on your platform (like Nutanix AHV or Citrix Hypervisor). You need to know the local admin username and password as in input for the winrm_username and winrm_password, which Packer uses for the WinRM communication to your provisioned vanilla Windows VM.
The only requirement is that WinRM is enabled on the VM, so remote management is possible by Packer. Packer provided a script that can help you enable WinRM the correct way for Packer.
Note: by default, this is winrm_insecure = "true". When you need encrypted WinRM, you must also provision certs on your vanilla Windows VM. I will skip that in this blog post.
The scripts (CMD and PowerShell), even for encrypted WinRM, can be found in the WinRM Communicator documentation: https://www.packer.io/docs/communicators/winrm
WinRM script copied from the HashiCorp documentation:
rem basic config for winrm
cmd.exe /c winrm quickconfig -q

rem allow unencrypted traffic, and configure auth to use basic username/password auth
cmd.exe /c winrm set winrm/config/service @{AllowUnencrypted="true"}
cmd.exe /c winrm set winrm/config/service/auth @{Basic="true"}

rem update firewall rules to open the right port and to allow remote administration
cmd.exe /c netsh advfirewall firewall set rule group="remote administration" new enable=yes

rem restart winrm
cmd.exe /c net stop winrm
cmd.exe /c net start winrm
The Citrix Hypervisor scenario
During a project, I was tasked to create a Golden Image-as-Code with Packer for a customer using on-premises Citrix Hypervisor. They want to use Microsoft Azure for failover, so I thought that Packer is a good option to build a high available cross-platform image. I knew there was a community-supported Citrix XenServer builder, thanks to DDelano. Source: https://github.com/ddelnano/packer-plugin-xenserver/.
So for me, it looked like a perfect idea to specify two builders in the Packer Template (XenServer and Azure), so the same image is built on the Citrix Hypervisor and Azure in parallel. And the image is highly available.
This was my initial thought:
source "xenserver" "PatrickvandenBorn-Builder-XS" {
    builder params go here...
}

source "azure-arm" "PatrickvandenBorn-Builder-Az" {
    builder params go here...
}

build {
    sources = ["sources.xenserver.PatrickvandenBorn-Builder-XS", "sources.azurearm.PatrickvandenBorn-Builder-XS"]

    provisioners go here...
}
During the development, I discovered that the community-supported Citrix XenServer provider was not actively maintained for a long time and that not all scenarios for Citrix Hypervisor were available in that builder. Since community supported Citrix XenServer builder is not maintained frequently, I didn’t want to depend my production image on this builder. After some time, I realized that the null builder could help me in the Citrix Hypervisor scenario.
The Citrix Hypervisor Null builder flow
I realized I could provision the Citrix Hypervisor VM builder using the Citrix Hypervisor PowerShell SDK https://docs.citrix.com/en-us/citrix-hypervisor/sdk-api.html. After provisioning the VM via Citrix Hypervisor SDK, I can use the null builder to provision the Packer provisioners. This allows me also to deploy the same Packer build parallel to XenServer and Azure as my initial thought.
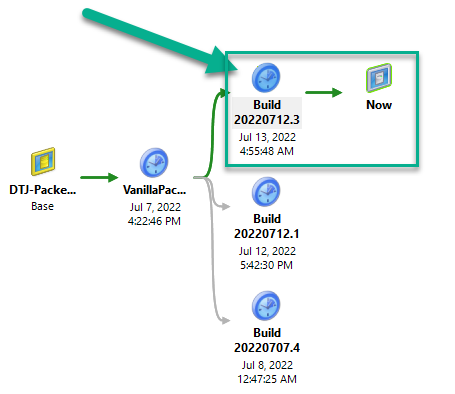
In our Packer process on Citrix Hypervisor, we’ve provisioned a vanilla Windows 10 virtual machine and enabled WinRM on it. Then, we’ve created a snapshot called “vanilla_packer” which the pipeline reverts to before the Packer null build is started. After the null build, the VM is shut down, and a snapshot with the build number of the pipeline run is created, which can be used for MCS or PVS deployment.
The flow is as follows:
- Revert Packer Builder Snapshot, which reverts to a vanilla snapshot (Revert-XSSnapshot.ps1)
- Packer init
- Packer Build (null builder, shutdown VM with command provisioner shutdown /s /t 30 /f)
- Create Packer Builder Snapshot, which creates a snapshot with the build number (Create-XSSnapshot.ps1)
- Remove obsolete build snapshots, saving SR space (Clear-XSSnapshot.ps1)
After this procedure, you can use the snapshot as input for Citrix Machine Creation Services, for example.
The three PowerShell scripts are available on my GitHub repository. The scripts have a synopsis of how to use them. Remark: Use these scripts at your own risk!
https://github.com/pvdnborn/pvdnborn/tree/main/CitrixHypervisor/BuilderScripts
Citrix Hypervisor graphical overview:
Some additional thoughts
Since there is no native Nutanix AHV builder (update!!), the same approach can apply to Nutanix AHV using the Prism API. I know there are blogs for Nutanix and Packer using QEMU or KVM builder, but these are not native Nutanix AHV VMs.
Lastly, I’m hoping that common hypervisor vendors like Nutanix and Citrix will enable the Image-as-Code approach for their customers and community by creating and maintaining an official Packer Builder. I see more Enterprises are switching to an everything-as-code approach and embracing tools like HashiCorp Packer since WDS, MDT, SCCM, and Ivanti Automation are hard to manage from an as-code/pipeline approach.
Nutanix Update 29-08-2022
After posting this blog I got informed that there is a Nutanix Builder for AHV. https://github.com/nutanix-cloud-native/packer-plugin-nutanix Hoping to see this on packer.io soon.
Wil update this post later.