In the previous blogs I’ve explained you “How to: Install and configure Microsoft SQL Server 2016 Standard multi-subnet Basic Availability Groups for Citrix XenDesktop and XenMobile” and “Microsoft SQL and Microsoft SQL AlwaysOn basics for Citrix Admins”.
This blog is a guide for configuring Citrix XenApp/XenDesktop with a multisubnet SQL AlwaysOn Datastore. When using a MultiSubnet SQL AlwaysOn SQL Cluster, you have to reconfigure all the XenDesktop connection strings to use the MultiSubnetFailover=True feature.
For your information: Configuring MultiSubnetFailover=True connection string is only possible using powershell at this moment. MultiSubnetFailover=False is the default setting after a new site installation.
During a customer’s project I’ve created the following XenDesktop backend:
- One XenDesktop Site called: “PBO-LAB”
-
Two Zones
- Primary Zone: “Amersfoort” containing two delivery controllers
- AMF-DDC001
- AMF-DDC002
- Secondary Zone: “Nijkerk” containing two delivery controllers
- NRK-DDC003
- NRK-DDC004
-
The VDA’s connecting to the corresponding delivery controller in their corresponding site.
- Two GPO’s are configured. Both with the Citrix Policy “Controllers” for the corresponding site.
Logical overview:

Note: Site-to-site network latency is 4ms.
Create the initial databases
Before setting up a new XenDesktop Site, we need to create three empty databases and join them to a (Basic) AlwaysOn Availability Groups. You can do this as follows:
1. Open SQL Management Studio and connect to one of your SQL Servers
2. Right click databases –> New Database…
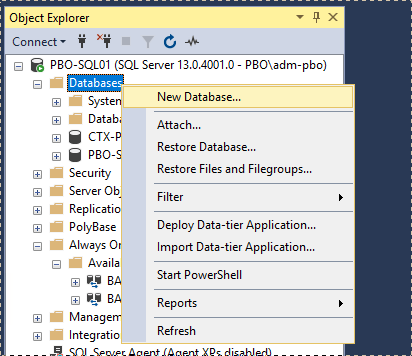
3. Enter the Citrix Site database name, for example “XD-Site”:

4. Click Options. Make sure you configure the following:
Collation: Latin1_General_100_CI_AS_KS
Recovery model: Full
Is Read Committed Snapshot On: True

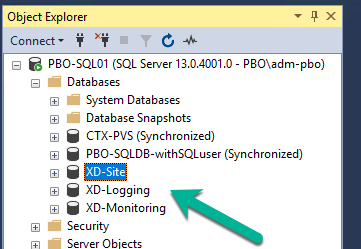
5. Create an empty “Logging” and “Monitoring” database with the same procedure. You will have three databases in the end:
Joining the Citrix XenDesktop databases to (Basic) AlwaysOn Availability Group(s)
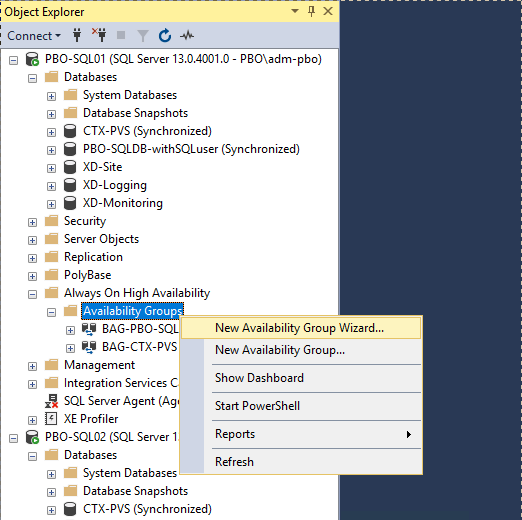
Now we need to join the XD-Site, XD-Logging and XD-Monitoring databases to AlwaysOn Availability Groups. Since I’m using SQL 2016 Standard I will create three different Basic Availability Groups as follows:
1. As a prerequisite for AlwaysOn, backup all three databases. Right click the database, choose Tasks –> Back Up..

2. Create a Full file backup of the database:

3. In SQL Studio, Right Click Availability Groups and choose New Availability Group Wizard…
4. Click Next

5. Specify the Availability Group name and click next

6. Select the database to join the Availability group and click Next:

7. Click Add Replica

8. Login to your second SQL server:

9. Select “Automatic Failover” and ensure Availability Mode “Synchronous Commit”. Click listener tab:

10. Configure a DNS-name and IP-addresses in both subnets for the listener

11. Use a temporary SMB File share for seeding the database, click Next

12. Validation completed successfully, click next

13. Click Next

14. SQL is creating the Availability Group for you:

15. Done, Click Close:

16. Create a Availability Group for the Logging database:

17. Create a Availability Group for the Monitoring database

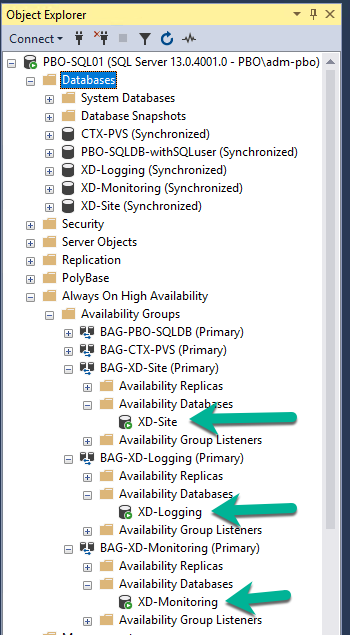
18. You will having three Availability Groups in the end:
Configure Citrix XenDesktop to use the MultiSubnetFailover Availability Group
Since we’re now having empty Site, Monitoring and Logging databases in three different Basic Availability Groups, we can now install and configure XenDesktop to use these databases as follows:
1. Install the Citrix Delivery Controller software like you’ve always do:

2. Launch Citrix Studio and start “Site setup”

3. Select “A fully configured, production-ready Site” and enter your “Site name”, click Next

4. Here’s where you configure the FQDN’s for the three SQL Availability Groups with their corresponding database name. Click Next

5. Configure your Licensing and Click Next

6. Configure your hosting connection, click Next

7. Configure your features and click Next

8. Summary of your site configuration. Verify the SQL information and click Next

9. The site and databases are configured
Configuring MutliSubnetFailover=true connection string
Your site is now configured using SQL AlwaysOn using MultiSubnetFailover=False by default. If you are using a single subnet AlwaysOn configuration, your good now. When using a MultiSubnet AlwaysOn configuration you need additional configuration, although everything will appear to work correctly.
Let me explain a bit: Since we’ve configured two IP’s in different subnets for the listeners, Windows Failover Clustering will configure both IPs in DNS:
C:\Windows\system32>nslookup Default Server: PBO-DC01.pbo.lan Address: 10.9.0.10 > bag-xd-site.pbo.lan Server: PBO-DC01.pbo.lan Address: 10.9.0.10 Name: bag-xd-site.pbo.lan Addresses: 10.9.0.222 10.11.0.222 |
Since only one SQL node is able to read and write to the SQL-database, Windows Failover Clustering controls which listener IP is Online and which one is Offline. In this screenshot, when the SQL node in subnet 10.9.0.0/24 fails. The listener IP 10.11.0.222 will come online and IP 10.9.0.222 will go offline:

We’re using the Fully Qualified DNS name of the SQL AlwaysOn listener for the connection. Windows and another operating system will contact one of the IP-addresses of the DNS-record by a round-robin mechanism. This is like Russian roulette if the on-line IP is resolved by the round-robin mechanism.
So this is the point the MultiSubnetFailover=True connection string is needed. When a SQL connection is configured with MutliSubnetFailover=True, the SQL driver knows about the multi-subnet configuration and will figure out which IP is online and will try to failover to the other one when a SQL node will become inactive. So it is a good idea to configure this feature for your XenDesktop Delivery Controllers. So configure it on all of your delivery controllers as follows:
1. Login to your Citrix Desktop Delivery Controller
2. Close all Citrix Studio consoles on this Delivery Controller
3. I’ve updated the script from https://support.citrix.com/article/CTX216504, so it supports more availability groups. You can download it here https://vandenbornit-my.sharepoint.com/:u:/g/personal/patrick_vandenborn_it/ERQDUZeX_aZOt1abpabdwY4B7VpcMFFn3BfZFZ8g4eY5Sg?e=ldst8n or copy paste it from below:
###################### # # Updated script for SQL Basic availability Group # # Sources: https://support.citrix.com/article/CTX216504 # # Patrick van den Born 15-02-2018 # ######################## #Vars $SiteBAGName = "BAG-XD-Site.pbo.lan" $SiteDBName = "XD-Site" $LogBAGName = "BAG-XD-Logging.pbo.lan" $LogDBName = "XD-Logging" $MonitorBAGName = "BAG-XD-Monitori.pbo.lan" $MonitorDBName = "XD-Monitoring" $cs="Server=$SiteBAGName;Initial Catalog=$SiteDBName;Integrated Security=True;MultiSubnetFailover=True" Write-Host $cs $csLogging= "Server=$LogBAGName;Initial Catalog=$LogDBName;Integrated Security=True;MultiSubnetFailover=True" Write-Host $csLogging $csMonitoring = "Server=$MonitorBAGName;Initial Catalog=$MonitorDBName;Integrated Security=True;MultiSubnetFailover=True" Write-Host $csMonitoring #Add Snapin Add-PSSnapin Citrix* #Disable logging set-logsite -state "Disabled" #Clear connections Set-AnalyticsDBConnection -DBConnection $null -force # 7.6 and newer Set-AppLibDBConnection -DBConnection $null -force # 7.8 and newer Set-OrchDBConnection -DBConnection $null -force # 7.11 and newer Set-TrustDBConnection -DBConnection $null -force # 7.11 and newer Set-HypDBConnection -DBConnection $null -force Set-ProvDBConnection -DBConnection $null -force Set-BrokerDBConnection -DBConnection $null -force Set-EnvTestDBConnection -DBConnection $null -force Set-SfDBConnection -DBConnection $null -force Set-MonitorDBConnection -DataStore Monitor -DBConnection $null -force Set-MonitorDBConnection -DBConnection $null -force Set-LogDBConnection -DataStore Logging -DBConnection $null -force Set-LogDBConnection -DBConnection $null -force Set-ConfigDBConnection -DBConnection $null -force Set-AcctDBConnection -DBConnection $null -force Set-AdminDBConnection -DBConnection $null -force #Set Multisubnet connections Set-AdminDBConnection -DBConnection $cs Set-ConfigDBConnection -DBConnection $cs Set-AcctDBConnection -DBConnection $cs Set-AnalyticsDBConnection -DBConnection $cs # 7.6 and newer Set-HypDBConnection -DBConnection $cs Set-ProvDBConnection -DBConnection $cs Set-AppLibDBConnection –DBConnection $cs # 7.8 and newer Set-OrchDBConnection –DBConnection $cs # 7.11 and newer Set-TrustDBConnection –DBConnection $cs # 7.11 and newer Set-PvsVmDBConnection -DBConnection $cs # PBO: Will fail, maybe needed by older DDCs Set-BrokerDBConnection -DBConnection $cs Set-EnvTestDBConnection -DBConnection $cs Set-SfDBConnection -DBConnection $cs Set-LogDBConnection -DBConnection $cs Set-LogDBConnection -DataStore Logging -DBConnection $csLogging Set-MonitorDBConnection -DBConnection $cs Set-MonitorDBConnection -DataStore Monitor -DBConnection $csMonitoring #Enable logging set-logsite -state "Enabled" #Get connection strings Write-Host "Configured connection strings for this controller" Get-AdminDBConnection Get-AcctDBConnection Get-AnalyticsDBConnection # 7.6 and newer Get-HypDBConnection Get-ProvDBConnection Get-AppLibDBConnection # 7.8 and newer Get-OrchDBConnection # 7.11 and newer Get-TrustDBConnection # 7.11 and newer Get-BrokerDBConnection Get-EnvTestDBConnection Get-SfDBConnection Get-LogDBConnection Get-LogDBConnection -DataStore Logging Get-MonitorDBConnection Get-MonitorDBConnection -DataStore Monitor |
4. Just fill out the following vars SiteBAGName, SiteDBName, LogBAGName, LogDBName, MonitorBAGName and MonitorDBName.

Experience: Disable Logging temporary, otherwise you will stuck at reconfiguring the connection strings. Cause: Logging DB connection is cleared and Citrix want to log everything even when not possible (logdb is down).
5. Run the script to reconfigure the SQL connections for this Desktop Delivery Controller:

6. At the end of the script you will have an overview of all the reconfigured connections

7. Execute the script on all of your Delivery Controllers in your site.
Now Citrix XenDesktop is configured for MultiSubnet SQL AlwaysOn Availability Group!